
It has been a year since I posted my in-depth review of the Loupedeck+ Console. One of my main issues with the unit, was that it was too difficult to keep track of all of the functions it was capable of, in the various applications that it supported. I had created paper overlays to label the functions for each application, and I shared that process in my review. Since then, I have been working with the guys at KB Covers to create a more polished solution, with well labeled plastic overlays, that we can market to other users as well. That product is finally available for purchase, and can be found here.
 We have created overlays for Premiere Pro, After Effects, and Photoshop, which are $20 each, or you can get all three for $45. Obviously having all three is helpful if you work in all of those applications, as keeping track of the changing functions between applications is half of the challenge. I have tried to alleviate some of that struggle by making the functionality more consistent between the applications, basing the overlays on a set of custom presets that are available here. You can use the improved preset settings for free, before buying the labeling overlays to go with them. (Mac users may need to zip the Layout folder back up, if your browser automatically unzips downloads, because the Loupedeck utility is looking for zip files to import settings from, or try this version.)
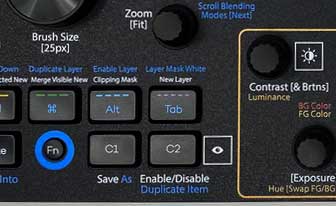 These custom settings are based on the defaults that users may be familiar with, but with some additional functions, and changes to increase consistency. For example, “Enable/Disable Layer” has been moved to button C2 for all apps, from three different places, and the function option is “Duplicate Item” (Layer) for all three. These changes should make it easier to memorize these controls.
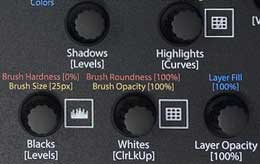 Making these presets, I actually learned even more about the Loupedeck’s options, especially in Photoshop, where I had based my knowledge of its functions on the customization options in the Loupedeck utility. Because many of the functions in Photoshop can’t be customized, they are not accessible or listed in that utility at all. I had wondered why I couldn’t assign the dials to do things in that application like I could in Premiere and After Effects, but it turns out this is because they have been hard mapped to adjustment layers.
 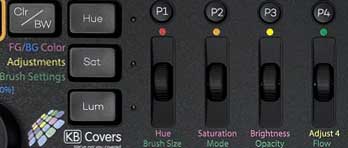 Pressing a dial creates a matching adjustment layer, and turning the dials alters the values of the created or selected adjustment layer. Same with the scroll wheels, which can’t be customized at all. This functionality is all correctly reflected in the overlays, much better than it is in the PDF manuals.
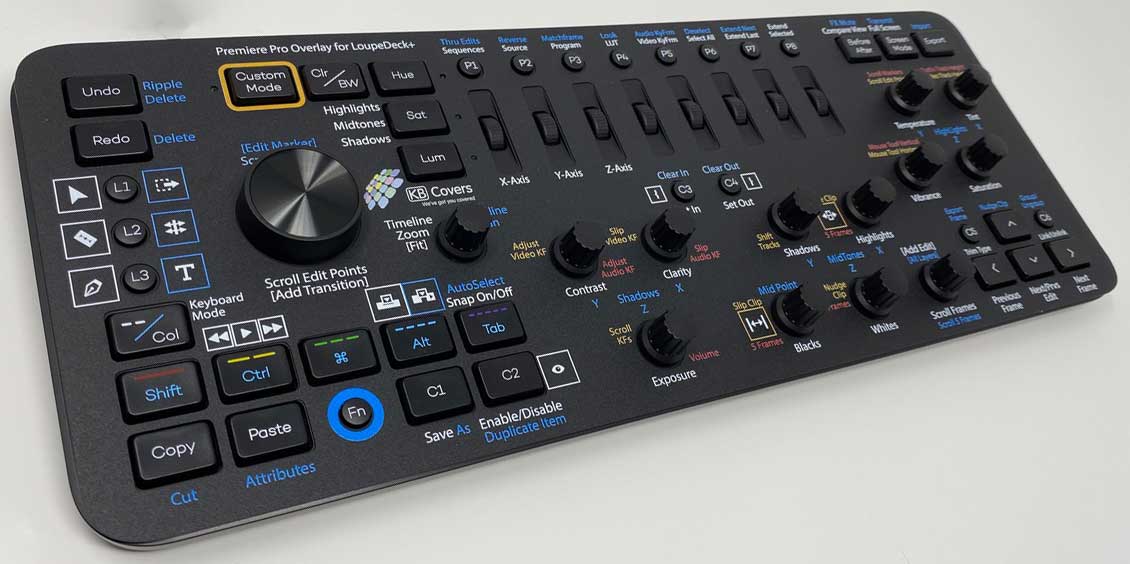
Here is a closer look at all of the labels and functions on each of the overlays:
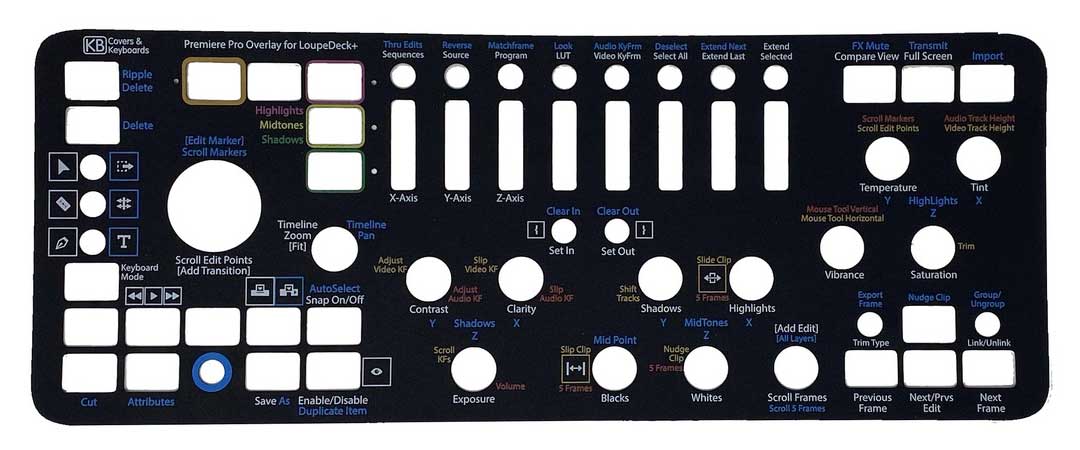
The main functions are in white, while the blue functions are accessible by holding down the “Fn” key. Pressing “Custom Mode” activates the orange functions. This also makes the red functions available when holding down the “Fn” key, when Custom mode is activated. The functions labeled in [brackets] are activated by pressing the dials instead of rotating them. Most dials reset edited values to defaults when pressed, which are not labeled, as not to overly clutter the interface.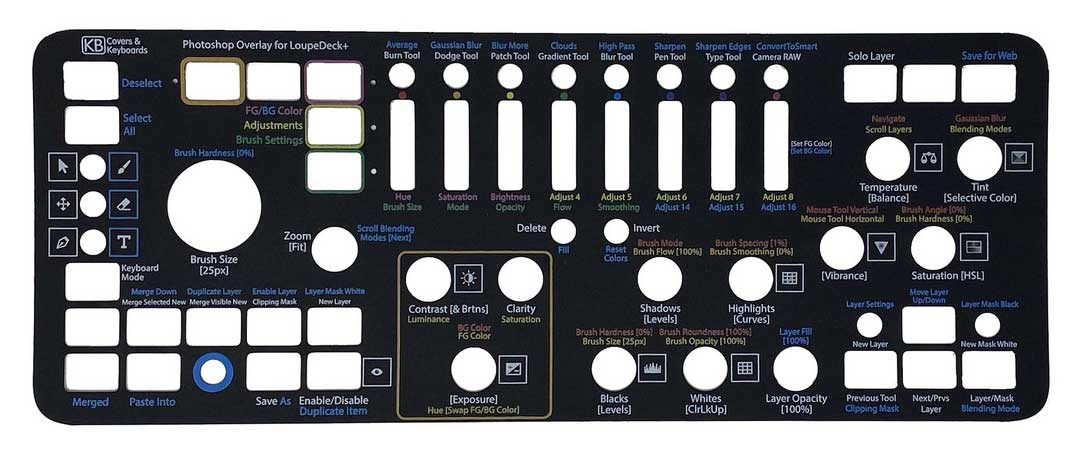 The Red, Yellow, and Green HSL buttons control what the scroll wheels to their right do, depending on the context. I have tried to color code them, and include as many labels as possible in the available space. I rarely see my Loupedeck without the overlays any more, but when I do see one, it feels blank and naked without all of the functionality labeled.
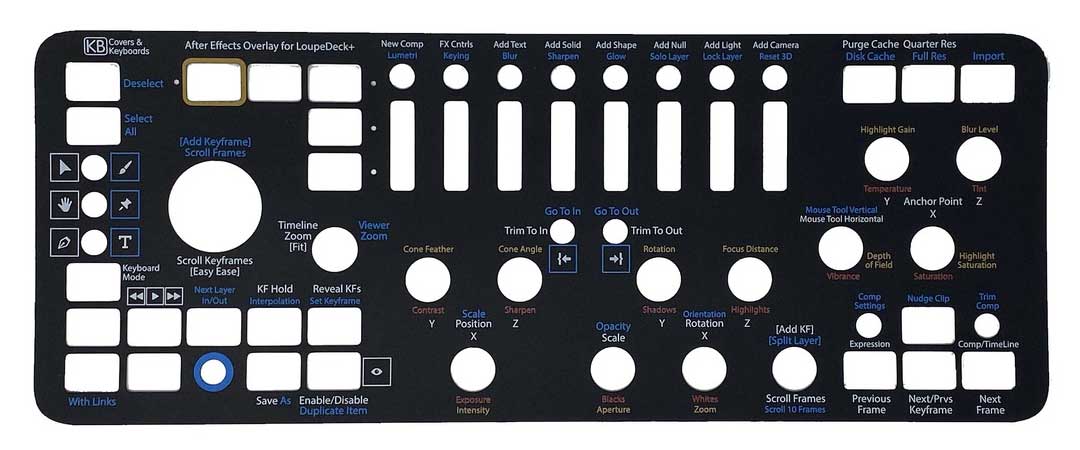
I could create overlays for other applications if we discover a big enough market for them, but I started with these three because:
A) They are the ones I needed and use,
B) They seemed like they would be the most popular with other Adobe users.
Audition and Final Cut seem like the most likely other ones people might want to buy, but I will wait until we have a number of requests before I invest the time needed to create those options. Comment below if there is another application overlay you would be willing to buy if it was available.

Hi! Just got the overlay, and very excited to use it.. however, the .zip file will not load. I’ve followed the instructions throughly, restarted loupedeck, restarted machine, etc. Once I locate the .zip file in the same directory with the instructions.txt, I get the pop up to select the app I want to install for (in this case, Photoshop), hit ‘ok’, and then I get “IMPORT FAILED!”.
would love to try it out…otherwise it’s an amazing looking overlay on my loupedeck+ at best. 🙂
thanks for you help!
btw.. i tried both of your downloads as well. re-zipped the layouts folder. still fails.
figured it out.. turns out that Loudeck is the only of my tools that you have to ‘go fetch’ the update. Once I updated to 4.01, i was able to install your presets. 🙂
Glad it worked for you. And good to know you needed 4.0.1. I was unaware that you needed 4.0.1 to use then, but that makes sense, because I recently updated the Premiere preset. I recommend using 4.1.1, as it is better for exporting your own presets. (For backing up your customizations, etc.) I hope you like the overlay now that you have the matching preset working.
I’m going to go ahead and get the three that you have on the market at the moment, as I’m dabbling more and more with all three apps.
However, I’d sacrifice one or both of my aged reproductive nodes for an Adobe Audition cover overlay.
Idea. How big of a nightmare would it be to offer a custom overlay on which the customer would place his/her preferred commands on a blank template overlay?
Thanks for your consideration.
This blank overlay idea is now available from KBCovers.
I would LOVE to have one of these for FCPX, or FCP, or whatever it’s called now.
What do you need help with?
I’m highly interested of the overlays for Lightroom, tell me how to help you to get this done. Maybe I can help, if you tell me how.
I’m having trouble with the new versions of Loupedeck software – all worked fine at 4.2.5, but that version will not work with the latest photoshop CC Upgrading to 5.0.3 and the import finds no application layouts in the zip file
Any idea what going on? and yes I have left the PS-V1e.zip file ziped at the same level as the instructions
Are you on Mac or PC? I have 5.0.3 working on my Win10 system, and it can import fine. I will be trying it on Win11 in a couple days, and I will have a Mac to test with in about two weeks. If you send me more info, I will see what we can do to get you up and running again.
PC Windows 10, uninstalled 5.0.3 and reverted to 4.2.5 overlay now imports without issue, but still doesn’t work with the latest photoshop CC
And yes I do have several versions of PS CC installed, as not all of the plugins work on the newest version
Can you try updating to 5.0.3 now that you have the profile imported. (It should persist through the upgrade.)
Hello Mike, is there any release date planed for the lightroom profile please . Greetings from Paris
Bjoern
Sorry, I didn’t see this while traveling. Hopefully by now you have realized that the Lightroom Overlay uses the default mappings, so there is no need to import a custom preset for that application.
Hi Mike. I love your Loupedeck+ Custom Profiles, and I have the overlay for Premiere Pro CC. However, I can’t seem to get the P6 Button press to perform the Delete function (white command on the overlay) on selected clips in the timeline . It is mapped to “Key: Delete”. Note: P6 + Fn correctly performs the Ripple Delete function. Do you have any suggestions on a workaround, or how this can be fixed? I tried mapping P6 to “Key: Backspace” but that didn’t work either to delete selected clips. I’m running Loupedeck’s Software version 5.1 on Windows 10 Pro. Thanks! JohnM
I am getting the same issue with the 5.1 drivers, but not with the 4.3.2 drivers, which work fine. So it looks like this was broken by Loupedeck in that upgrade. One workaround is to set “D” (or any other key) to Delete in the Premiere keyboard short cuts manager, and then set the Loupedeck P6 button to that keystroke. I just confirmed that this worked for me (With D) and I will report the issue to Loupedeck.
Thank you, Mike. For now, I mapped P6 to Premiere Pro’s “Cut” command, which effectively removes the selected clips from the timeline with a single button press. But it would still be nice to have a “Delete” function separate from the “Cut” command on the “Copy + Fn” button, as “Delete” does not place the deleted media onto the clipboard like Cut does.
GROUP/UNGROUP: I also found that the “C6 + Fn” button will create a “Group”, but it will not “Ungroup”. I believe this is because Premiere Pro sees these as two separate, independent commands (“Ctrl + G” and “Ctrl +Shift+ G”) and not a “toggle” like Link and Unlink. With “C6” you can choose either the “Group” or “Ungroup” command from the Loupedeck+ program. Just thought I’d pass that along, too. Thanks again!
Yeah I noticed the Ungroup issue in the newest drivers, but I don’t think that is getting fixed anytime soon. The Delete one probably will, but it may take them a while.
I found a better solution for getting Delete to work on the Loupedeck “P6” Button for Premiere Pro. Map it to the “Clear” command instead of “Key: Delete” and it works perfectly!
Would LOVE to see a Capture One overlay!
I am open to the idea, but I don’t use Capture One. So I would need a good preset to base the labeling on. (For example the P1-8 buttons aren’t mapped by default.) But if you can create a good fleshed out preset, I can create the matching overlay.