This is the second in a series of articles about computer networking for filmmaking and post production. Last time we took a broad look at the different technologies available, and the bandwidth speeds that different formats and workflows might require. It this article we will take a closer look at the oldest and most popular networking option for achieving bandwidths greater than 1 gigabit per second. Ten Gigabit Ethernet (10GbE) has been available in some form for nearly 20 years, but it was not widely used outside of server rooms until the last five years or so, and even now it is by no mean ubiquitous, even in media and post production environments. I believe the main obstacle has been pricing, specifically on the part of switches. 10GbE network interface cards (NICs) have been available at reasonably affordable prices for years, and are now finally starting to appear as integrated solutions built into high end motherboards, but the switches to connect these together have remained more than 10 times as expensive as their gigabit counterparts. So users have to really know what they are getting from 10GbE, and how it will help them, before shelling out the money for that upgrade. But there is a way to leverage the performance and bandwidth offered by 10GbE without investing hundreds or thousands of dollars in an expensive switch.
Regardless of your network architecture, the first step in getting higher bandwidth network connections, is to make sure you have 10GbE NICs in the systems you want to network together. Some newer systems like my Lenovo P620 workstation already have them built in. If not, you will need to buy an adapter. For desktops, this is pretty simple, as there are lots of PCIe based network cards out there from a variety of vendors. But what if you don’t have PCIe slots, like in a laptop, or an all-in-one, or nearly any Mac product? The challenge here is that 10GbE is such a high bandwidth connection, that you can’t just connect it via USB, because nearly all existing USB ports don’t have the bandwidth to support those data rates. This is where Thunderbolt comes in, as in interface that does provide both the bandwidth and the power needed to add a 10GbE connection to a system.
Sonnet Solo10G
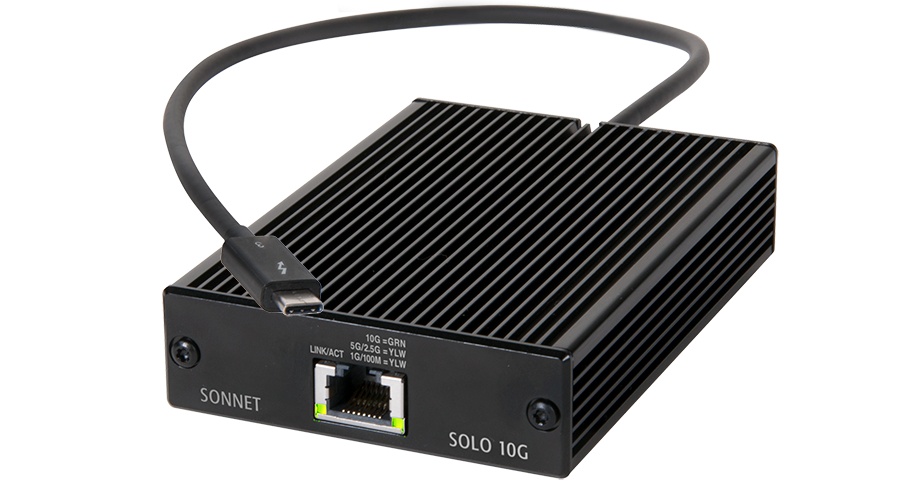
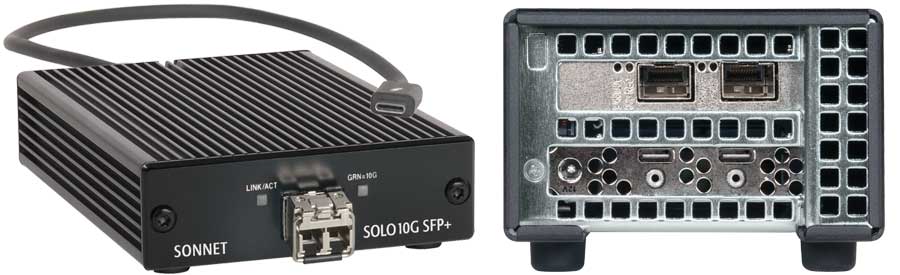
Sonnet was generous enough to provide me with one of their Solo10G Thunderbolt NICs for some network performance testing purposes a while back. Like many other options on the market, it adds a 10G-BaseT network connection to any system with a Thunderbolt 3 port. Unlike many of the competing vendors, Sonnet also offers a version with an SFP+ port, for fiber or TwinAx based connections. And they also sell larger dual port versions of both interfaces, for users who need redundant access, or have to connect to multiple networks. The Solo10G is also unique among Sonnet’s lineup in that it is the one that supports the lower data-rates of N-BaseT, allowing it to interoperate with 2.5G and 5G products, as well as utilize older Cat5E cabling while exceeding 1Gig connection speeds. I have used the Solo10G on a variety of networks, on both Macs and PCs, and gotten good performance in all cases.
While 10GbE offers a theoretical maximum bandwidth of 1.25 Gigabytes of data (10Gigabits/8) per second, you will rarely exceed 1GB/sec of actual data transfer in real world use, due to overhead, packet loss, etc. But that is 10 times more than Gigabit Ethernet, and as fast as most users storage systems can sustain anyway. Using the Solo10G is easy, plug it in and it should just work. But there are drivers available for download for Windows and Linux for further fine tuning if desired. If you are connecting the Solo10G to an existing network, it should configure itself automatically, as long as you have an active DHCP server, which is found in any router. But what if you don’t have a 10GbE switch, but still want to transfer files between your systems at 10GbE speeds? Most people don’t need 10GbE access to everything on their network, they just need 10GbE access to the system where all of their large files are stored. I first utilized 10GbE technology while finishing Act of Valor, and was processing a ton of 2K DPX files, which require 300MB/s. I was able to have two workstations linked with early CX4 based 10GbE NICS, to share the data from one large RAID directly connected to one of them, allowing smooth DPX playback directly over the network, which let me keep working on one system while the other one was busy rendering. You can directly connect two 10GbE NICs with a regular cable, and move data between them, but it does take some more configuration work to get them to communicate effectively without any other networking infrastructure in the mix.
Direct Connections
Networks can be a wide fabric linking many different devices through switches, or a single direct link between two systems. All of the various interfaces (CX4, RJ-45, SFP) support direct links between two “client” systems. But physically linking connections is not the only service that your switch provides. Even the most basic Ethernet switch will usually also be connected to a router. Routers are switches that also offer a number of other services to aid in setting up and running a network. Most home internet connections are shared over a simple router, which assigns IP addresses over DHCP, caches and forwards DNS requests, and does network address translation to sort incoming internet traffic. When you directly connect two systems, there is no router involved to manage those settings, so they have to be configured manually for the network to function properly.
The main unique identifier for any system on a modern network is its IP address. Each end point on a network must have a unique 4 byte IP address, and that is how traffic is directed to the correct final location. Systems with multiple network connections will have multiple IP addresses. These 4 byte addresses are displayed to users as a series of four numbers, separated by dots. On a large network, it is necessary to divide systems into separate subnets to keep all the traffic flowing smoothly, via subnet masks. This isn’t really needed for small networks, but still must be dealt with anyway, due to the way all network products are designed. Most small networks use a 255.255.255.0 subnet mask, resulting in the first three numbers in the IP address identifying what subnet a computer is on, while the last number is the unique ID of that system on that subnet. Usually on home networks, the subnet is 192.168.1. and each system has an IP address that starts with those numbers. These numbers are usually assigned by a dynamic host configuration protocol (DHCP) server, without needing user intervention. But we don’t have one of those on our direct connection, and (assuming you still need internet over gigabit or Wi-Fi) we will be using multiple network connections on each system. So we need to manually assign IP addresses (and subnet masks) to the NICs that are part of our 10GbE direct connection.
The way to do this on Windows 7/10/11 is in the Network and Sharing Center, accessible in Control Panel or by right clicking Network and selecting Properties. Then on the left column select Change Adapter Settings, and then right click and select properties of the network adapter you are using for your direct connection. Within that window select “Internet Protocol Version 4 (TCP/IPv4)” and click properties. This is where you set your IP address and other detailed network settings are found.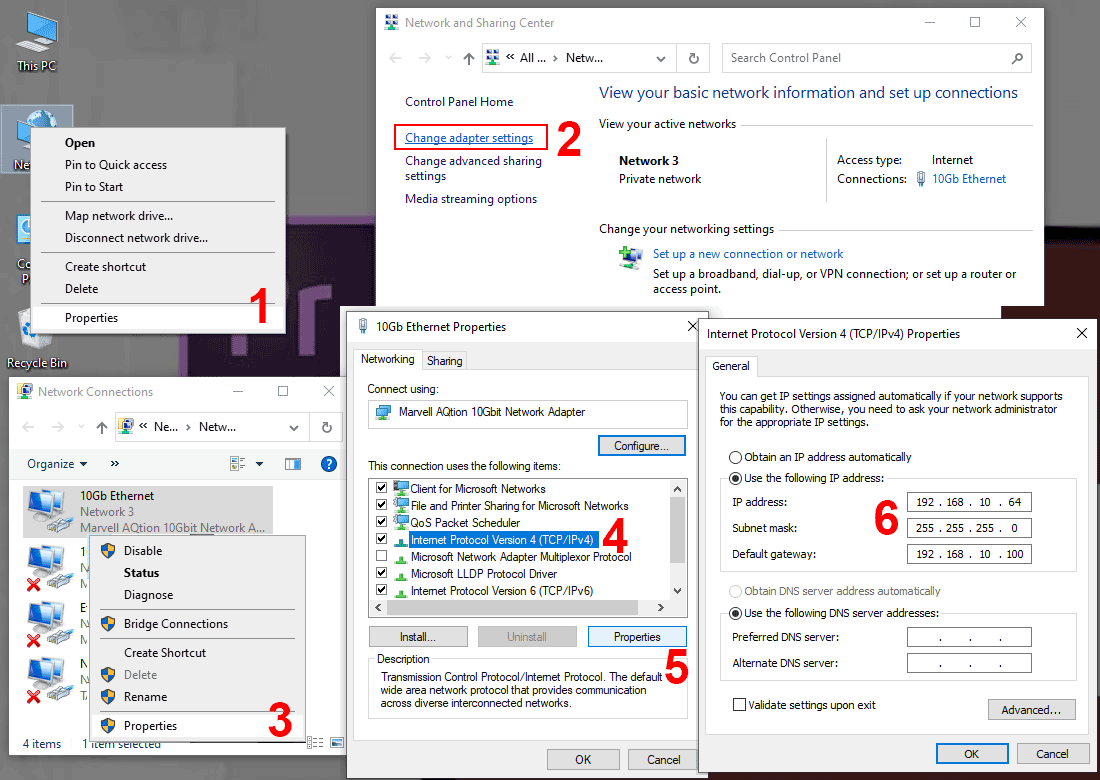
So what should you set it to? Technically you have many options when setting the IP address on a direct network link, as long as they are in the same subnet, but I would recommend something simple like 192.168.10.100 for one and 192.168.10.200 for the other side of that link. You want them to be in a separate subnet from your existing network, both so you don’t accidently choose an IP address already in use, and so that your computer knows which adapter to use when looking for a specific address. I use the 192.168.10 subnet for my dedicated 10GbE links, to make it easier to remember, and then I match the last number of the IP address to whatever that system is using on the existing network. So my workstation is 192.168.1.64 on my existing network, and I assign 192.168.10.64 to the 10GbE direct link. (And pretty much always set the subnet mask to 255.255.255.0.) That used to be all you needed to do, but increased network security in Windows has added one more step. Windows puts some major obstacles up to networks that don’t have a Default Gateway setup, which is where all internet requests are directed. We don’t have a gateway on our direct link, but we do have another system that will respond when Windows looks to verify that there is a gateway available. So setting the default gateway to the IP address of the other system on the link is a simple way to get around this issue. This allows you to set that connection as Private in windows, giving you higher network performance with fewer security limitations and traffic filtering.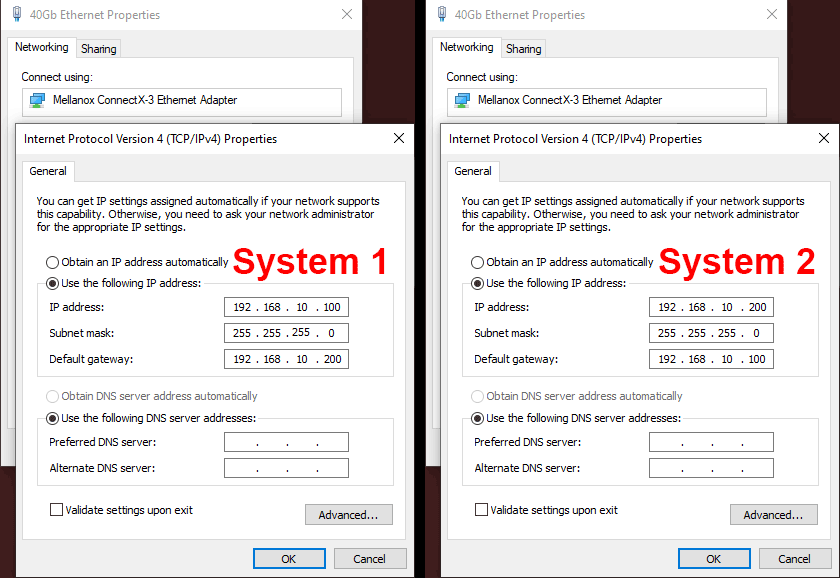
Once you have both systems connected, with manually set IP addresses in the same subnet, with their gateways set to the other system’s address, you should have yourself a 10GbE network link. So how do you utilize it? Other system’s IP addresses are usually hidden from the user behind domain names, that are tracked by a domain name server (DNS). For example “google.com” is the domain name for 142.250.72.206 and “MikeP620” is the name for my system with an IP address of 192.168.1.64. So your media files might be on a system called “MediaServer” with an address of 192.168.1.100 on your existing gigabit network, and a direct link address of 192.168.10.100. And you want to access these files from your “Workstation,” which is directly connected via a 10GbE link, with an address of 192.168.10.200.
If you open your Network window, you should see all of the other systems available from your computer (assuming you are also on a gigabit network with a router, printer, your phone, TV, etc.). And if you click on the MediaServer system, you should be able to access shared folders and such, just like before. But if you try to copy to or from that folder, you will probably notice that you are still limited to 120MB/s, just like before. It is just sending the data over the default path, through the router, even though there is a much faster and more direct 10GbE route available. How do you force your computer to use the new 10GbE connection? By using the IP address on the target system’s 10GbE NIC.![]()
Navigating to \\MediaServer\FolderShare will probably direct traffic over your slower connection, so you need to access it at \\192.168.10.100\FolderShare to force the traffic over the faster link. You can verify this by watching the network utilization in the task manager. And your transfers should go much quicker, reporting speeds in the hundreds of megabytes per second, depending on the speed of your storage solution. You can automate that routing of traffic by mapping network drives to that IP address path, making the process of forcing that traffic over that route seamless to the user.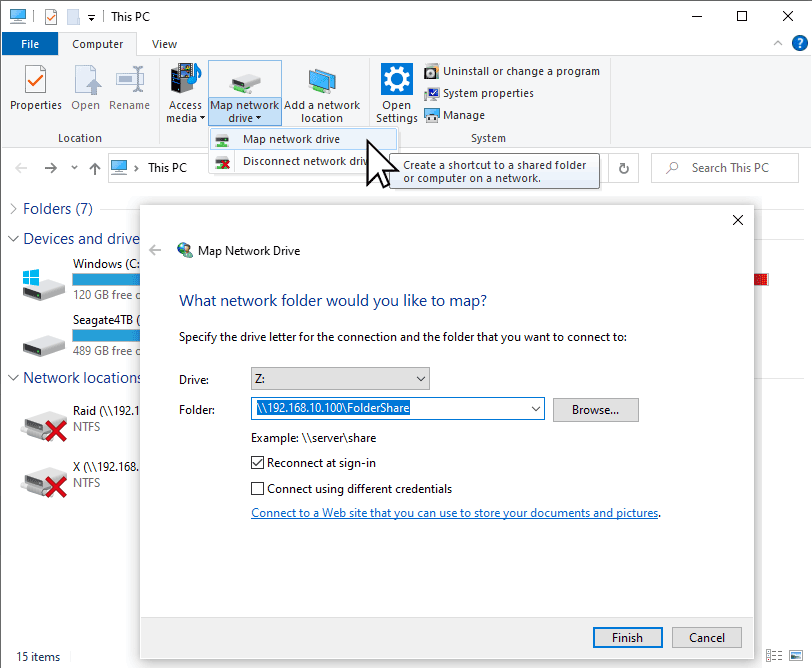
This allows you to share data between two systems at high speed, without investing in a switch. But what if you have more than two systems that need to be connected? With dual port network cards, you can connect three systems in a triangle, where each has full speed access to the other two systems. The three separate links each need their own subnet, and I utilized this approach when I had three people on the editorial team for the film 6Below. The scaling beyond that introduces new limitations, but is possible. As long as the clients only need high speed access to a central data location, and not to each other, you could use a quad port card to connect up to four other workstations to a main system, supporting a total of five users. Each link would need to be its own subnet, and I used this layout for a rapid turnaround project being done out of an RV, when we edited the Hot Wheel’s Double Loop Dare at the 2012 X-Games in LA. Anything beyond that, and I highly recommend making the investment into a proper switch. It simplifies the configuration process, keeps everything on a single network, and allows for much easier expansion in the future. We will examine that process, as well as N-BaseT in the next part in the series.