In the previous post we have looked at the process of shooting 360 video, and getting it processed into a single stitched equirectangular file. Now we will look at what we can do with that imagery once it is formatted correctly. Premiere has quite a few options for VR, with even more 360 editing functionality made possible through a variety of plugins that are available.
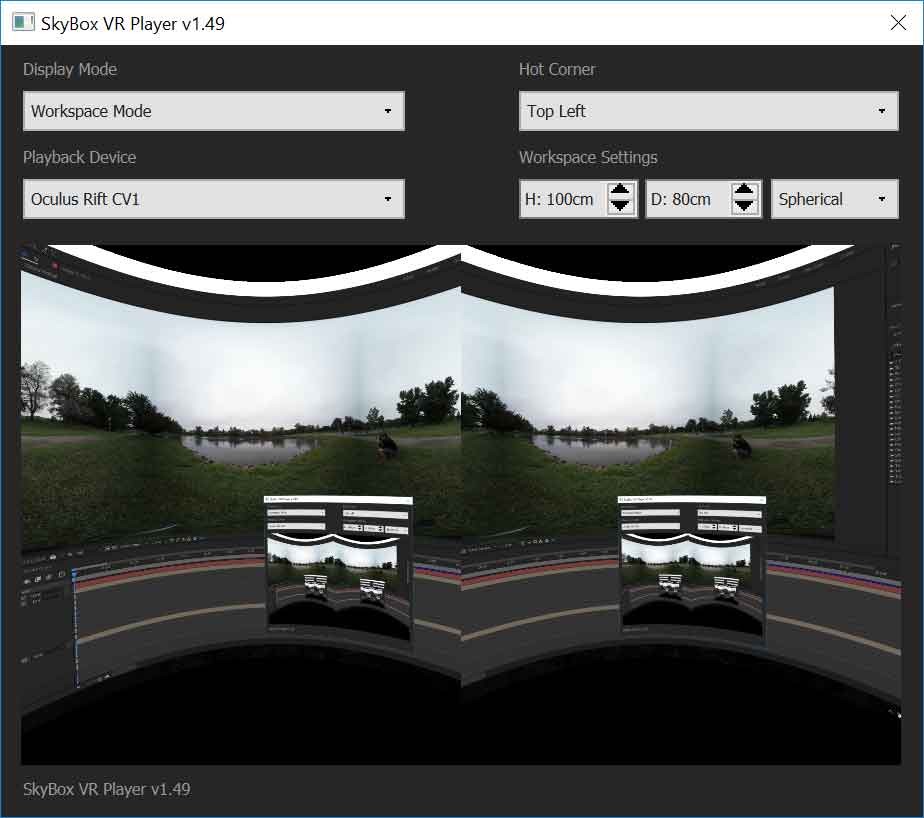 Previewing your work is important, so if you have a VR headset, you will want to make sure it is installed and functioning with your editing software. I will be basing this article on using an Oculus Rift to view my work in Adobe Premiere Pro 11.1.2 on a Thinkpad P71. Premiere requires an extra set of plugins to interface to the Rift headset. Adobe acquired Mettle’s Skybox VR Player plugin back in June, and has made it available to Creative Cloud users upon request, which you can do here. Skybox can project the Premiere UI to the Rift, as well as the output, so you could leave the headset on when making adjustments, but I have not found that to be as useful as I had hoped. Another option is to use the GoPro VR player plugin to send the Premiere output to the Rift, which can be downloaded for free here. (Use the 3.0 version or above) I found this to have slightly better playback performance, but fewer options. (No UI projection) Adobe is expected to integrate much of this functionality into the next release of Premiere, which should remove the need for most of the current plugins, and increase the overall functionality.
Once you have one or more stitched 360 videos, in the equirectangular projection, ideally saved in a 2:1 aspect ratio, you are ready to start viewing and editing your footage. Launch Premiere Pro, and import your footage, as you normally would. If you are using the Skybox player plugin, turn on Adobe Transmit, with the HMD selected as the only dedicated output. (In the Skybox VR configuration window, I recommend setting the Hot Corner to Top Left, to avoid accidentally hitting the Start Menu, desktop hide, or application close buttons during preview.) In the playback monitor, you may want to right click the wrench icon and select Enable VR, to preview a pan-able perspective of the video, instead of the entire distorted equirectangular source frame. You can cut, trim, and stack your footage as usual, and apply color corrections and other non-geometry based effects.
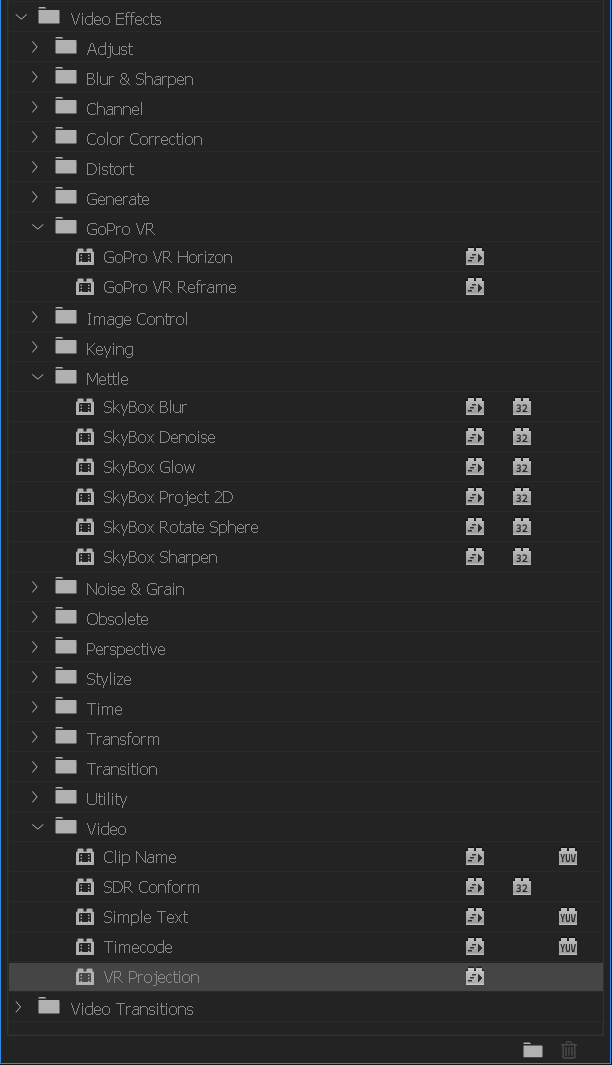 In version 11.1.2 of Premiere, there is basically one VR effect (VR Projection), which allows you to rotate the video sphere along all three axis. If you have the Skybox Suite for Premiere installed, you will have some extra VR effects. The Skybox Rotate Sphere effect is basically the same. You can add titles and graphics, and use the Skybox Project 2D effect to project them into the sphere where you want. Skybox also includes other effects for blurring and sharpening the spherical video, as well as denoise and glow. If you have Kolor AVP installed, that adds two new effects as well. GoPro VR Horizon is similar to the other sphere rotation ones, but allows you to drag the image around in the monitor window to rotate it, instead of manually adjusting the axis values, so it is faster and more intuitive. The GoPro VR Reframe effect is applied to equirectangular footage, to extract a flat perspective from within it. The field of view can be adjusted and rotated around all three axis.
Most of the effects are pretty easy to figure out, but Skybox Project 2D may require some experimentation to get the desired results. Avoid placing objects near the edges of the 2D frame that you apply it to, to keep them facing toward the viewer. The Rotate Projection values control where the object is placed relative to the viewer. The Rotate Source values rotate the object at the location it is projected to. Personally, I think they should be place in the reverse order in the effects panel.
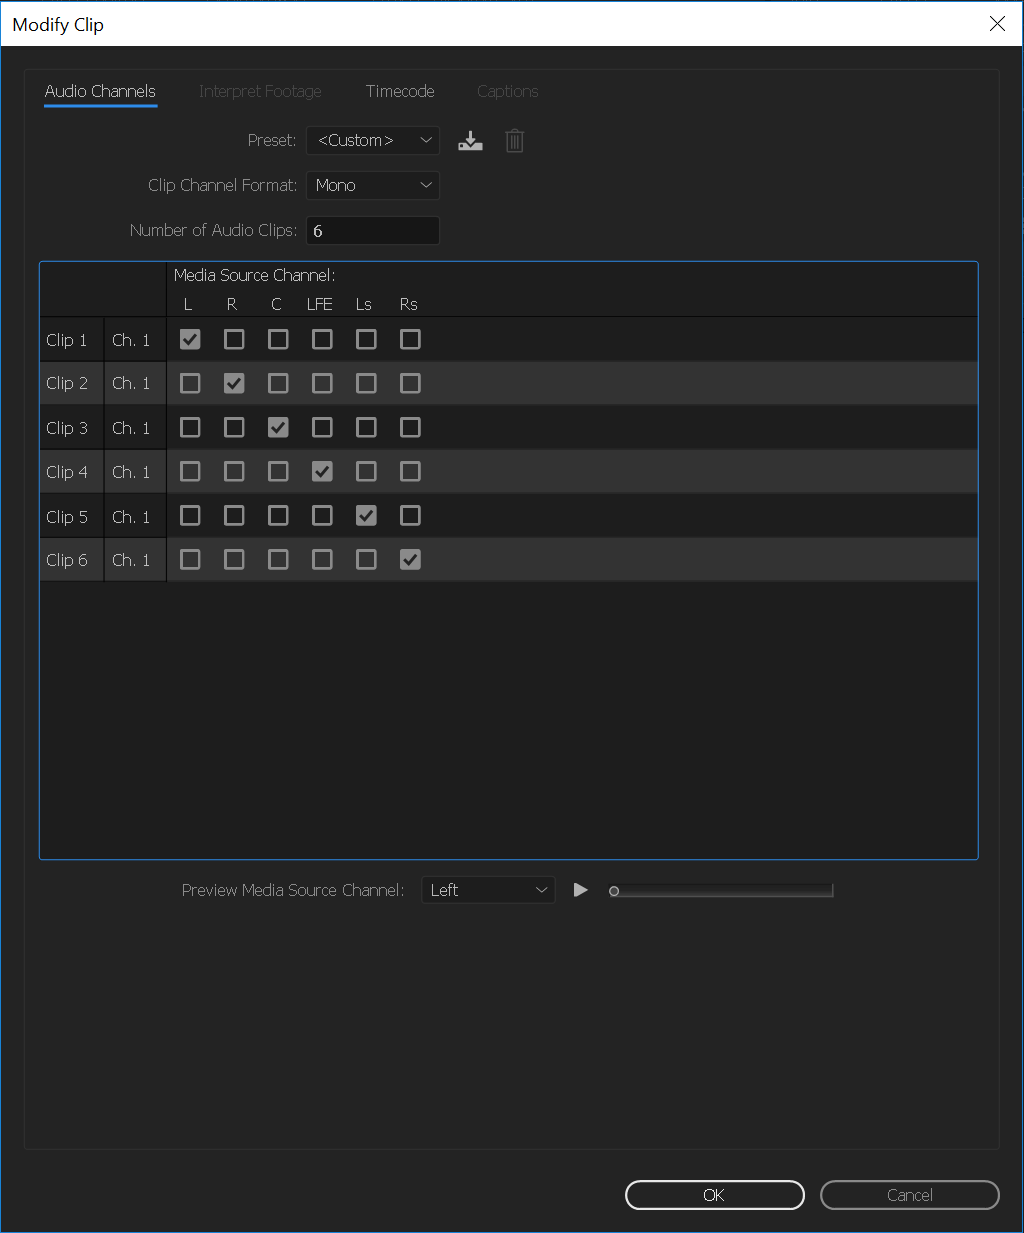 While Premiere only officially support mixing in Stereo or 5.1 surround, they do support exporting 4.0 Ambisonic files in the H.264 and H.265 exporters. It can pass recorded 4.0 audio through multi-channel sequences, or with a little ingenuity, you can mix mono and stereo tracks to 4.0 using a 5.1 sequence and some creative track routing. You will need your source audio in a 5.1 sub sequence, which you can mix as normal, with the center and LFE dials set to zero. That sequence should have its audio track properties set to 6
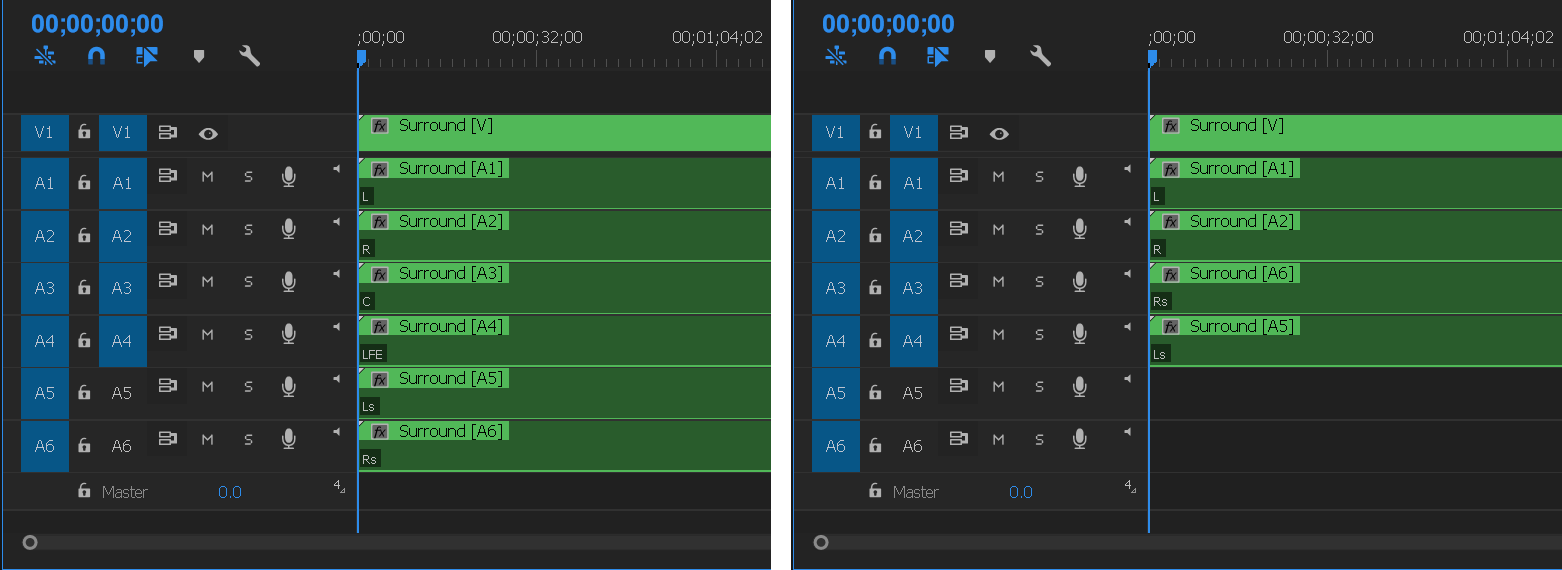
 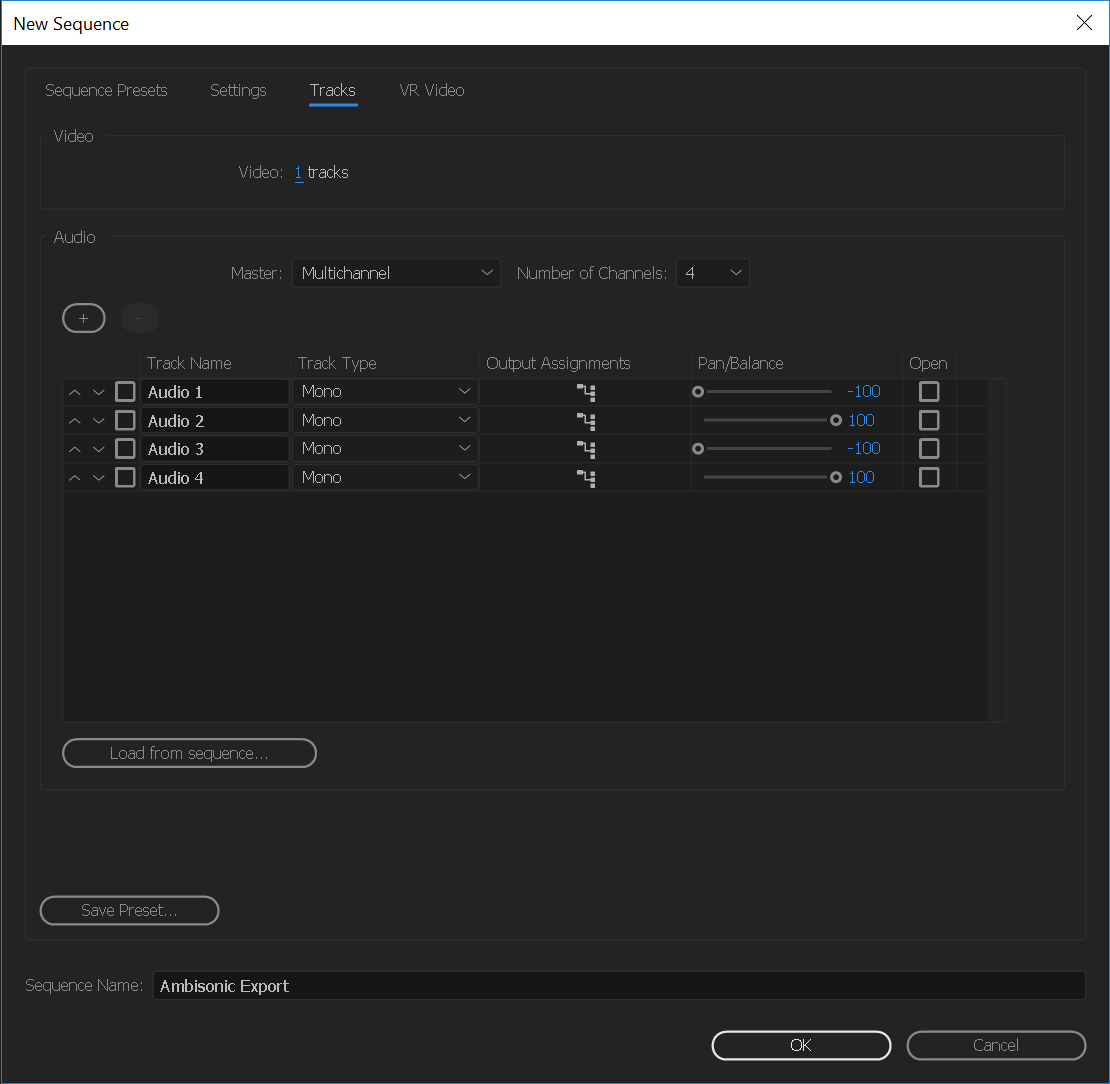 mono tracks. Right Click on it in the Project panel, select Modify->Audio Channels. (Match the settings pictured on the right, click to enlarge the picture.) Create a new multi-channel export sequence, with 4 channels and 4 mono tracks, mapped to channels 1-4. (Refer to picture on the left) Drag the 5.1 sub-sequence into the export sequence, and it should create two new tracks to fit the 6 mono tracks. Alt-Select and delete channels 3 and 4, which are the empty center and LFE tracks. Drag the sixth channel into the third track, and the fifth channel into the fourth track. (See below) Any mixes you make in the surround sequence should now map to 4.0 in the export sequence, ready to encode to H.265.
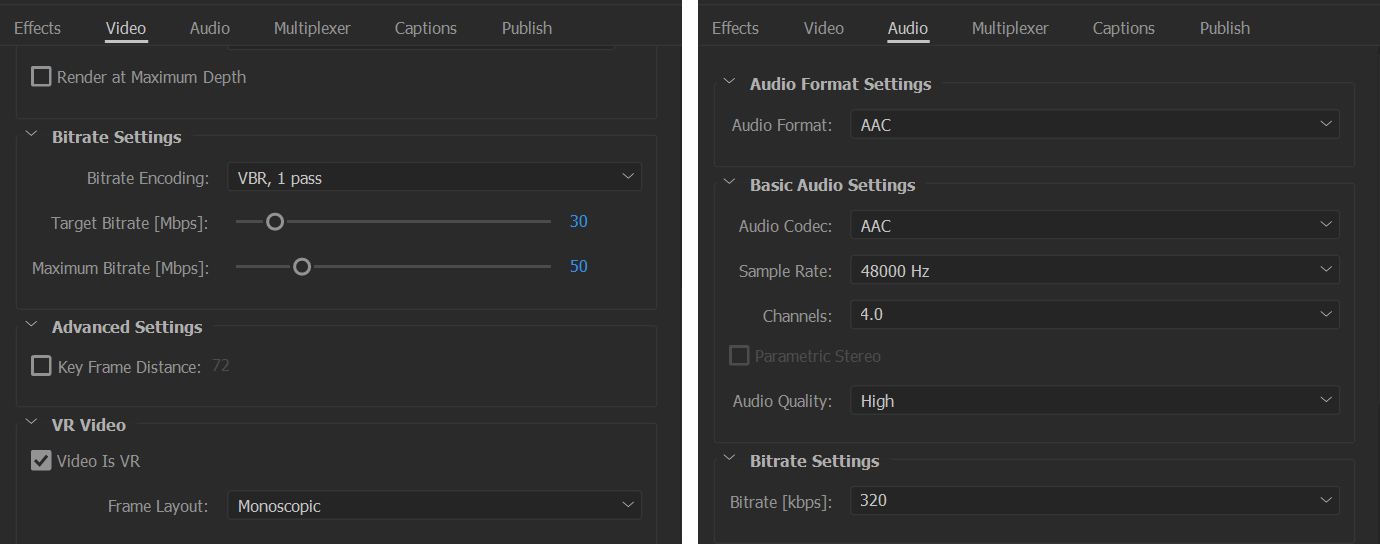
Encoding the final output is not difficult, send it to Adobe Media Encoder, using either H.264 or H.265 format, and make sure the Video is VR box is checked at the bottom of the video settings pane, and in this case that the Frame Layout is set to Monoscopic. There are presets for some of the common framesizes, but I would recommend lowering the bitrates, at least if you are using Gear360 footage. Also, if you have Ambisonic audio, set Channels to 4.0 in the Audio pane.
 Once the video is encoded, you can upload it directly to Facebook. If you want to upload to Youtube, exports from AME with the VR box checked should work fine, but for videos from other sources you will need to modify the metadata with this app here. Once your video is uploaded to Youtube, you can embed it on any webpage that supports 2D web videos. And Youtube videos can be streamed directly to your Rift headset using the free DeoVR Video Player.
That should give you a 360 video production workflow from start to finish. I will post more updated articles as new software tools are developed, and as I get new 360 cameras with which to test and experiment.

Nice article, also saw the article you wrote for Post Perspective. Have you had a chance to check out the 360 stabilizer from RE:Vision Effects. This is a unique solution for the market the product is called RE:Lens. I produced a video with the folks at PixPro where their marketing guy talks about how it is used. If you have some time download a trial copy. If you have any more questions please let me know.
I do business development for RE:Vision.
I had not come across that solution yet. It looks cool, so I will download it and check it out.